
Store a portable air conditioner the wrong way and you’ll invite moldy smells, damaged parts, and a frustrating first hot day next summer. If you’ve ever unpacked your unit only to be greeted by stale odors or a blinking error code, you’re not alone. The good news? Totally avoidable. In this guide, you’ll get a step-by-step plan to winterize your portable AC in a single afternoon. By the end, you’ll know exactly how to clean, dry, and protect your unit so it starts fast, smells fresh, and runs efficiently when warm weather returns.
Why proper storage of a portable AC matters more than you think
Age isn’t the real problem for most units—quiet moisture and dust buildup during storage is. Portable air conditioners condense water on their coils while running, and a surprising amount can remain inside even after you power down. Left for months, that water invites mold and bacteria, creates musty odors, and can corrode metal parts. Filters that stay clogged with dust and pet hair force the compressor to work harder, raising energy use and shortening the unit’s life.
Mechanical details matter, too. Kinked exhaust hoses, missing drain caps, or bent aluminum fins reduce airflow and cooling capacity. Window kits that aren’t stored properly may crack or warp, complicating spring setup. Tampering with the sealed refrigerant system is never advised; even so, rough off-season handling can stress components and hurt performance. What’s interesting too, most manufacturer manuals call for a cool, dry location and an upright position during storage. Kept upright, the compressor is protected and the oil can settle before next use.
A quick story: I once rushed my end-of-season routine and skipped the “fan-only dry” step. Next summer, a faint musty odor greeted me on startup. It took a full afternoon of careful cleaning and drying to get the unit back to fresh. Since then, I’ve followed a simple checklist: drain, dry, clean, protect, and store. Do these, and you dramatically cut the chance of bad smells while extending your AC’s life. Government and health organizations emphasize moisture control—keeping indoor humidity around 30–50% helps prevent mold and also protects electronics and appliances in storage. See the U.S. Environmental Protection Agency and CDC links below.
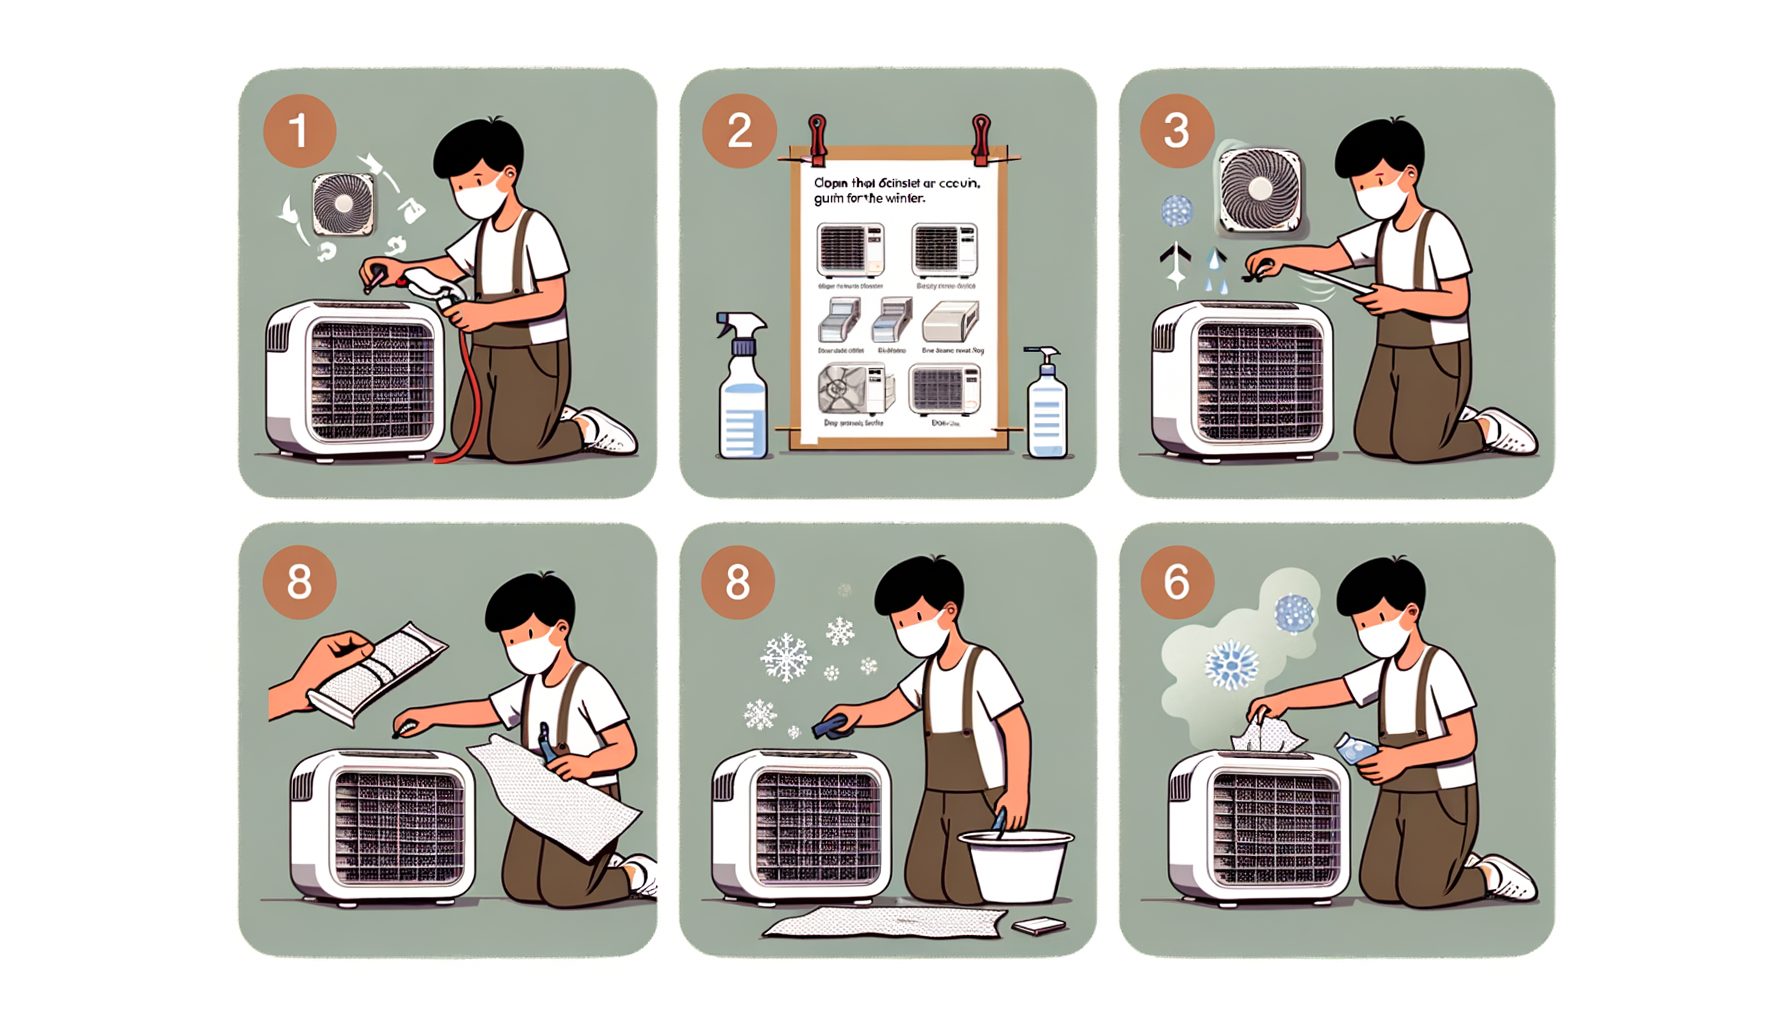
Step-by-step: how to store your portable AC for winter
Step 1: Run a drying cycle. If your unit has “Fan” or “Dry/Dehumidify” mode, run it for 20–30 minutes after your last cooling session. Doing so moves air across the evaporator coil and evaporates residual moisture. If you only have “Cool,” run it briefly, then switch to “Fan” for 30 minutes with the exhaust hose connected so moisture exits the room.
Step 2: Power down and unplug. Turn the unit off, disconnect from power, and wait a few minutes for internal fans to stop. Safety first.
Step 3: Drain the water. Most portable ACs include a drain plug or port near the base. Place a shallow tray or pan beneath it, remove the cap, and drain completely. If you’ve used a continuous drain hose, detach and drain that hose as well. The unit can be tilted gently backward and then forward to coax out the last drops. Replace and tighten the drain cap when finished.
Step 4: Clean or replace filters. Remove the air filters and vacuum both sides. Washable filters can be rinsed with lukewarm water and a small drop of mild dish soap, then rinsed clear. Let them air-dry fully before reinstalling. If a filter looks tired or worn, order a replacement now so you’re ready for next season.
Step 5: Dust coils and fins carefully. If your model allows, open the rear intake grille to access evaporator or condenser fins. Use a soft brush or a can of compressed air to lift surface dust. The delicate aluminum fins are easily bent; if that happens, a fin comb can gently straighten them. Harsh cleaners should be avoided unless labeled safe for AC coils.
Step 6: Clean the exterior, exhaust hose, and window kit. Wipe the cabinet with a slightly damp cloth and mild soap, then dry it. If accessible, wipe the exhaust hose inside and out, and be sure it’s dry before collapsing. Clean the window bracket and foam seals; let all pieces dry completely to prevent mildew.
Step 7: Inspect for wear. Look over the power cord for nicks, check for cracked hose cuffs, and confirm that panel screws are snug. If anything seems off—such as oily residue that could signal a refrigerant issue—stop and contact a qualified technician. Sealed components shouldn’t be opened by the user.
Step 8: Organize small parts. Gather remotes, screws, drain caps, and window-kit pieces into a labeled bag. Tape the bag to the unit or tuck it into the window kit channel so nothing goes missing.
Step 9: Cover with a breathable layer. A cotton sheet or breathable appliance cover works best. Airtight plastic traps moisture; gentle airflow prevents condensation and odors.
Step 10: Store upright in a cool, dry place. Keep the unit vertical, off the floor if your space gets damp, and away from direct sunlight or heat sources. If a basement or garage is your only option, set the AC on a pallet, place desiccant packs nearby, and consider running a dehumidifier to maintain 30–50% relative humidity.
Step 11: Set a reminder for spring. Add a calendar note to install a fresh filter and let the unit stand upright for several hours before first use, especially if it was moved or tilted during storage.
Deep clean and drying techniques to prevent mold and odors
Mold needs moisture and time; remove one and you win. Choose a warm, low-humidity day if possible. Run fan-only or dry mode with the exhaust hose attached for 20–30 minutes to push dry air over internal coils. After powering down, drain the tank completely. A gentle tilt toward the drain helps evacuate stubborn pockets of water. Remove the filter and dry it separately.
Start mild when cleaning: a microfiber cloth plus a bit of gentle dish soap will lift cabinet and hose grime without harsh residues. If the coils are dusty, use a soft brush or compressed air held a few inches away. For persistent odors, an HVAC coil cleaner labeled residential and non-corrosive can be applied lightly per instructions—ensure full drying before reassembly. Bleach and strong solvents can corrode metals and damage plastics, so skip them. Also avoid spraying liquids into electronics or the fan motor housing.
Hoses often stay damp unless you intervene. Extend the hose fully and place it near a fan or in a warm, dry room for a few hours. If the inner surface still feels cool or clammy, give it more time. Do the same for the drain port and cap—wipe, leave uncapped for 30 minutes to air out, then close firmly. Silica gel packs placed near the base during storage can catch stray humidity.
Already noticing a musty smell? Try this sequence next spring: run fan-only for 20 minutes with windows open; remove and clean the filter; apply a light, coil-safe cleaner per directions; keep the room at 30–50% relative humidity while the unit dries. I learned the hard way after skipping the drying step once—lingering odor took a couple of hours to fix. Then this: I always allow extra drying time. It’s faster to prevent moisture than to remove it later.
For broader guidance on moisture and mold prevention in homes, see the EPA and CDC resources in the sources. Controlled humidity protects your portable AC and supports better indoor air quality, while preserving other electronics and furnishings.
Smart storage conditions: temperature, humidity, and space tips
Where you store your portable AC can make or break your next-season experience. Ideal conditions mirror what electronics prefer: cool, dry, and stable. Temperature swings expand and contract plastic and rubber parts; high heat can warp lightweight panels and degrade foam seals, while freezing can make plastics brittle. Aim for indoor storage near normal room temperatures. If a garage or basement is unavoidable, choose the driest corner, elevate the unit off concrete, and keep it out of direct sun and freezing drafts.
Humidity is the quiet troublemaker. In high humidity, any moisture left inside can lead to mildew. Many health and building sources recommend 30–50% indoor relative humidity to minimize mold risk. A small dehumidifier, desiccant tubs, or even a well-ventilated closet can help. In coastal or tropical climates, check once or twice over winter to confirm the cover breathes and no condensation forms on the cabinet.
Space and positioning count. Keep the AC upright to protect the compressor. Turn exhaust outlets and intakes away from dusty shelves; drape a sheet loosely over the unit. Don’t stack heavy boxes on top—cabinets can deform and airflow paths can be restricted. Store the window kit flat rather than leaning, and place delicate pieces like foam sealing strips in a labeled bag. In areas with pests, cap or tape hose ends to keep insects out.
These simple habits compound into better results: less odor, fewer surprises, and a faster setup next summer. Here’s a quick table with targets, reasons, and references.
| Best practice | Why it matters | Reference |
|---|---|---|
| Store in a cool, dry indoor space; avoid freezing and high heat | Protects plastics, seals, and electronics from warping or brittleness | U.S. DOE: Room AC guidance |
| Keep indoor humidity around 30–50% during storage | Reduces mold and mildew risk inside the unit | EPA: Mold and moisture, CDC: Mold basics |
| Run fan-only or dry mode 20–30 minutes before storing | Evaporates residual moisture on coils and in the drain path | ENERGY STAR: Equipment maintenance |
| Clean and fully dry filters, hose, and drain components | Prevents odors, boosts airflow, and protects efficiency | U.S. DOE: Filter cleaning |
| Store upright; allow time upright before first use | Helps compressor oil settle and protects internal parts | LG Support: Portable AC care |
Off-season maintenance and next-summer prep
Winter storage doubles as the perfect moment for small maintenance that prevents big headaches. Start with the filter: if it’s thin, frayed, or permanently discolored, order a replacement now so shipping delays won’t cost you comfort later. Inspect the exhaust hose for soft spots, cracks, or loose cuffs. Hoses endure heat and movement; replacing a worn one restores airflow and cooling. If your unit uses foam seals around the window kit, a fresh set can stop leaks that make the AC work harder.
Next, check your manual for model-specific advice and cleaning intervals. Many manufacturers recommend periodic coil and grille cleaning to maintain airflow. Keep a small kit with the unit—microfiber cloths, a gentle coil-safe cleaner, a fin comb, spare foam seals, and a labeled bag for screws and caps. If you saw error codes during summer, jot them down and visit your brand’s support pages before storage. Small fixes now can prevent larger issues when you need cooling fast.
As spring nears, prep is easy. Move the AC to its operating room, keep it upright, and let it stand for a few hours if it was tilted in transport. Install the window kit, confirm a snug seal, and insert the clean filter. Run fan-only for 10–15 minutes to clear any dust, then test cooling briefly to verify performance. Unusual noise, persistent odor, or signs of refrigerant trouble (like oily residue) mean it’s time to power down and call a professional. Well, here it is: sealed systems shouldn’t be opened by the user, and refrigerants are regulated in many countries—handling requires certification. See the U.S. EPA overview for background.
Follow these steps and your portable AC shifts from seasonal hassle to ready-on-day-one appliance. A small off-season investment pays off in comfort, efficiency, and peace of mind.
Frequently asked questions
How long should my portable AC sit upright before using it after storage? If it stayed upright in storage, you can generally use it right away. If it was tilted or transported on its side, let it stand upright for several hours before powering on to allow compressor oil to settle.
Can I store my portable AC in a garage or basement? Yes, if those spaces are dry and stay above freezing. Elevate the unit off concrete, keep it covered with a breathable cloth, and use a dehumidifier or desiccant to maintain 30–50% relative humidity.
Do I need a cover? A breathable cover or cotton sheet helps keep dust off while allowing moisture to escape. Avoid airtight plastic wraps—they can trap condensation and encourage mildew.
How do I prevent the musty smell next summer? Dry thoroughly before storage (fan-only or dry mode), drain completely, and store in a low-humidity area. In spring, run fan-only with windows open for a few minutes before cooling.
What if I suspect a refrigerant leak? Look for oily residue or repeated cooling failure. Do not open the sealed system. Contact a certified HVAC technician. For general information on refrigerants and safety, see the U.S. EPA resources linked below.
Conclusion: store smart now, stay cool later
You’ve seen why storage matters, exactly how to dry, drain, and clean the unit, the best conditions for a cool, dry off-season, and the quick maintenance that makes next summer easy. The core idea stays simple: remove moisture, remove dust, protect parts, and choose a stable storage spot. Do it once, and your portable AC starts faster, smells fresher, and uses energy more efficiently when the heat returns.
Take action today: set aside one afternoon to walk through the steps. Start the fan-only dry cycle, drain the tank, wash and dry your filters, wipe the hose and window kit, and store everything upright in a low-humidity space. Label small parts, order any replacements now, and set a reminder for spring. If you have a dehumidifier, run it near your storage area to keep humidity in the 30–50% range all winter. These small moves turn into big results when temperatures spike.
If this was helpful, bookmark it as your yearly checklist and share it with anyone who uses a portable AC. Comfort starts with good habits, and you just built one. Ready to lock in a fresher, faster first cool next year? Your future self will thank you. Which step will you do right now—drain, dry, or clean?
Sources
U.S. Department of Energy – Room Air Conditioners: https://www.energy.gov/energysaver/room-air-conditioners
ENERGY STAR – Maintain Your Equipment: https://www.energystar.gov/saveathome/heating_cooling/maintain_your_equipment
U.S. Environmental Protection Agency – Mold: https://www.epa.gov/mold
Centers for Disease Control and Prevention – Mold: https://www.cdc.gov/mold
U.S. Environmental Protection Agency – Refrigerants Overview: https://www.epa.gov/snap/refrigerants
LG Support – Portable Air Conditioner Maintenance: https://www.lg.com/us/support/help-library/portable-air-conditioner-maintenance-CT10000027-20150400505825